CyberDefenders: Silent Breach Lab

CyberDefenders: Silent Breach Lab
Overview
In this engaging scenario, the Impossible Missions Force (IMF) has fallen victim to a sophisticated cyber attack that has compromised sensitive intelligence data. Luther sends field agent Ethan Hunt to retrieve crucial information from a compromised server. Despite receiving warnings about potential security risks, Ethan proceeds to download the critical intel. However, when the team attempts to access the retrieved files later, they discover that the data has become unreadable, potentially encrypted or corrupted by the attackers.
To recover this mission-critical intelligence, Ethan creates a forensic image of the compromised system and enlists the help of technical expert Benji Dunn to decode and recover the encrypted files. This is where your expertise as a digital forensics investigator becomes essential to the mission’s success. Throughout this investigation, you will utilize industry-standard forensic tools and techniques that mirror real-world digital forensics practices. The lab emphasizes hands-on experience with FTK Imager for disk image analysis, SQLite database examination for browser forensics, string analysis for malware reverse engineering, and various other forensic methodologies that are crucial for any SOC analyst or DFIR professional.
This forensic challenge will test your ability to analyze compromised systems, trace attack vectors, recover encrypted data, and piece together the complete timeline of a security incident. You’ll navigate through various aspects of endpoint forensics including file system analysis, browser artifact examination, email forensics, malware analysis, and data recovery techniques. The investigation requires a methodical approach, combining technical skills with analytical thinking to uncover the truth behind this cyber breach and ultimately recover the sensitive intelligence that could have global implications if it falls into the wrong hands. Let’s get started!
Question 1
Question 1: What is the MD5 hash of the potentially malicious EXE file the user downloaded?
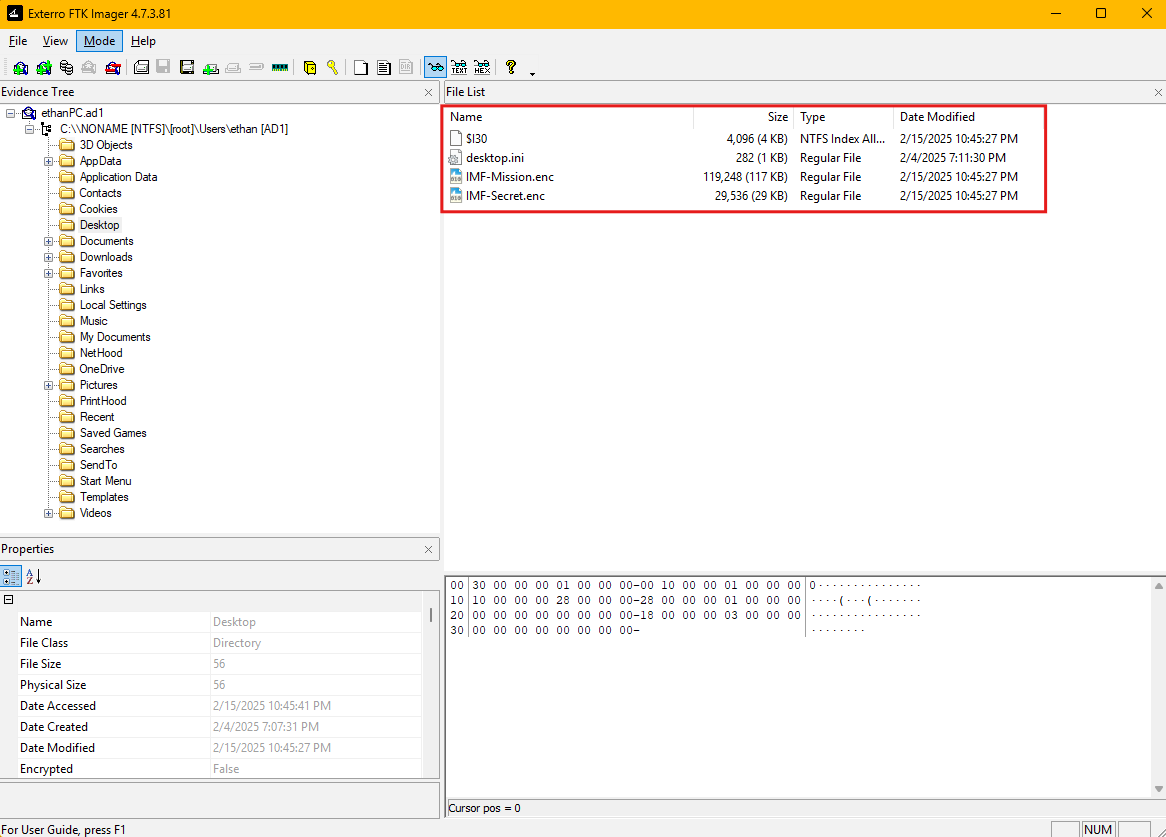
To begin the investigation of this compromised system, we need to examine the forensic disk image using FTK Imager. FTK Imager allows us to create bit-for-bit copies of storage devices and examine file systems without altering the original evidence, making it essential for maintaining forensic integrity during digital investigations. When we open the disk image in FTK Imager, we can navigate through the file system hierarchy displayed in the Evidence Tree pane on the left side of the interface. This tree structure shows the logical organization of the file system, allowing us to explore different directories and their contents systematically. For this investigation, we focus our attention on the Downloads folder, which is typically located within a user’s profile directory. The Downloads folder is important in forensic investigations because it represents one of the most common locations where users save files from the internet, including potentially malicious executables that may have been delivered through phishing campaigns, drive-by downloads, or social engineering attacks.
Upon examining the Downloads folder, we can see several files that warrant investigation. Among these files, we notice an executable file with a suspicious filename, using double extensions, that stands out from typical user downloads.
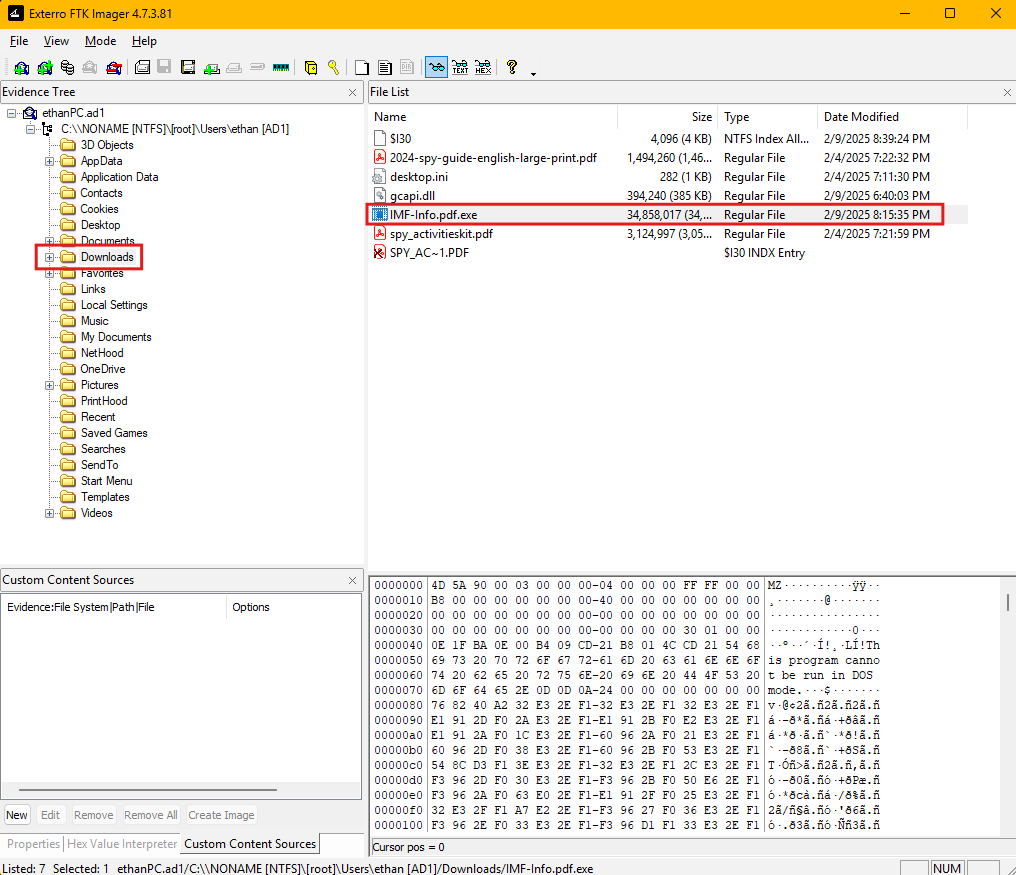
The presence of executable files in the Downloads folder should always be treated with caution during forensic analysis, as attackers frequently use this location to stage their malicious payloads before execution. We can extract the file hashes using FTK Imager.
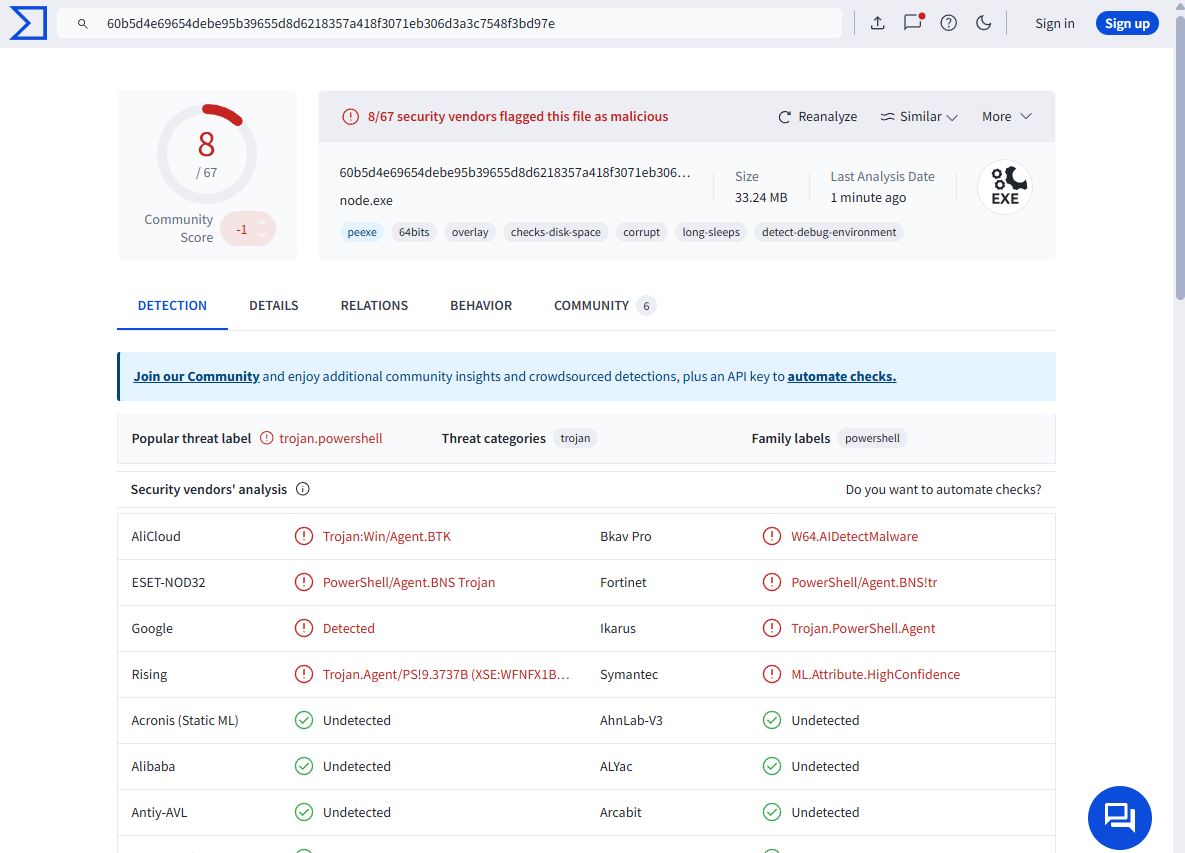
Once we obtain the hashes of the executable file, we can leverage threat intelligence platforms like VirusTotal to gather additional context about the file’s malicious nature. VirusTotal is a free online service that analyzes files and URLs for malicious content using multiple antivirus engines and threat detection tools. By submitting the MD5 hash to VirusTotal, we can determine whether this file has been previously identified as malicious by the security community. The analysis reveals that multiple security vendors have flagged this file as malicious, confirming our suspicions about its nature.
Question 2
Question 2: What is the URL from which the file was downloaded?
Digital forensics often requires understanding user behavior patterns, and web browsers serve as rich sources of evidence that can reveal how malware was delivered to a compromised system. Modern web browsers store extensive metadata about user activities, including visited websites, download history, and cached content, all of which can provide crucial insights into the attack vector used by threat actors. When we examine the application data folders within the user profile, we can observe that the user had multiple web browsers installed on the system, specifically Google Chrome and Microsoft Edge.
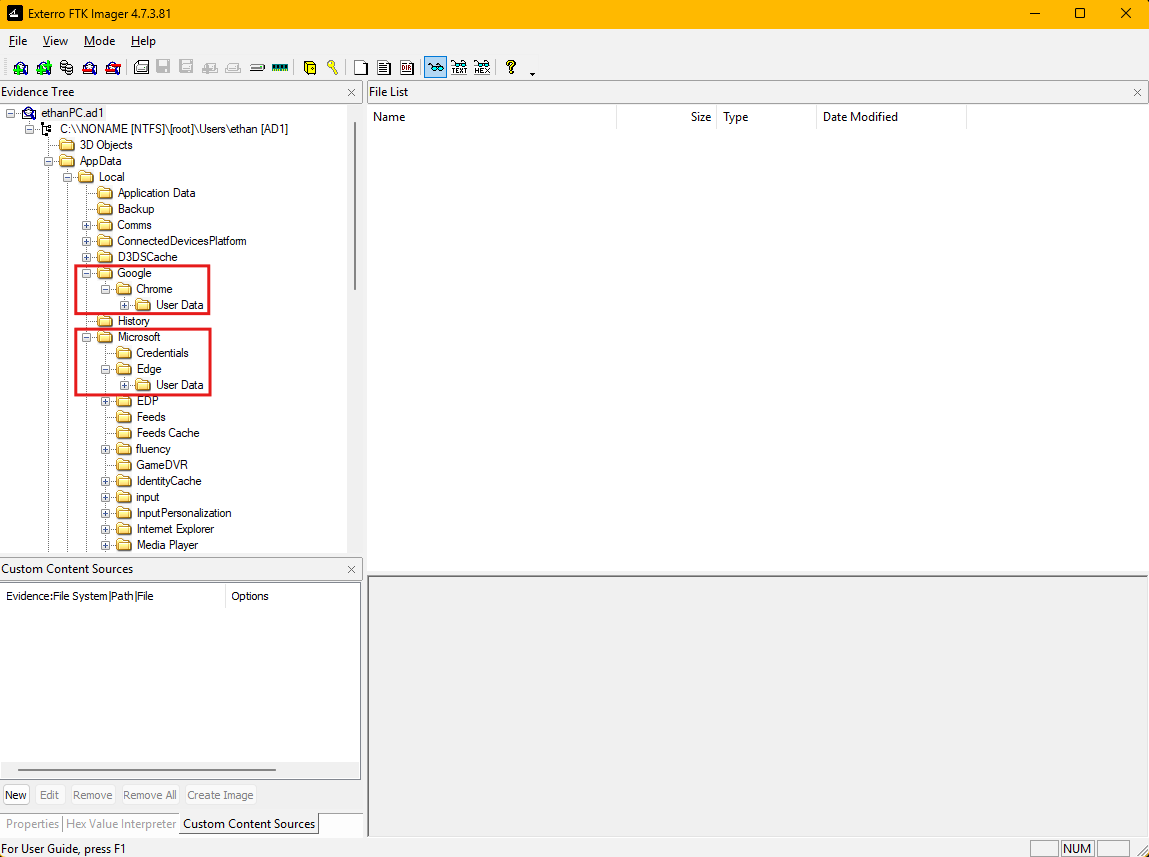
This is a common configuration in many enterprise environments where users may have access to multiple browsers for different purposes or compatibility requirements. Each browser maintains its own separate database files to store user activity, which means we need to examine each browser’s artifacts individually to get a complete picture of the user’s web activity during the timeframe of the security incident.
The browser history database is a SQLite database file that contains detailed records of user web browsing activities. SQLite is a lightweight, serverless database engine that is widely used in applications for local data storage due to its reliability and simplicity. In the context of web browsers, the History database stores information about visited URLs, timestamps of visits, download activities, and various metadata that can be invaluable during forensic investigations.
File Path: C:\Users\ethan\AppData\Local\Microsoft\Edge\User Data\Default\History

To extract and analyze this crucial evidence, we need to export the History database file from the forensic image using FTK Imager. Once extracted, we can open the History database in our SQLite viewer. We need to focus our attention on the downloads table, which specifically tracks files that have been downloaded through the browser. This table contains several important fields including the URL from which files were downloaded, the local file path where they were saved, timestamps indicating when the download occurred, and various metadata about the download process. By examining the downloads table, we can identify entries that correspond to the timeframe of our security incident and specifically look for downloads to the Downloads folder where we discovered the malicious executable.
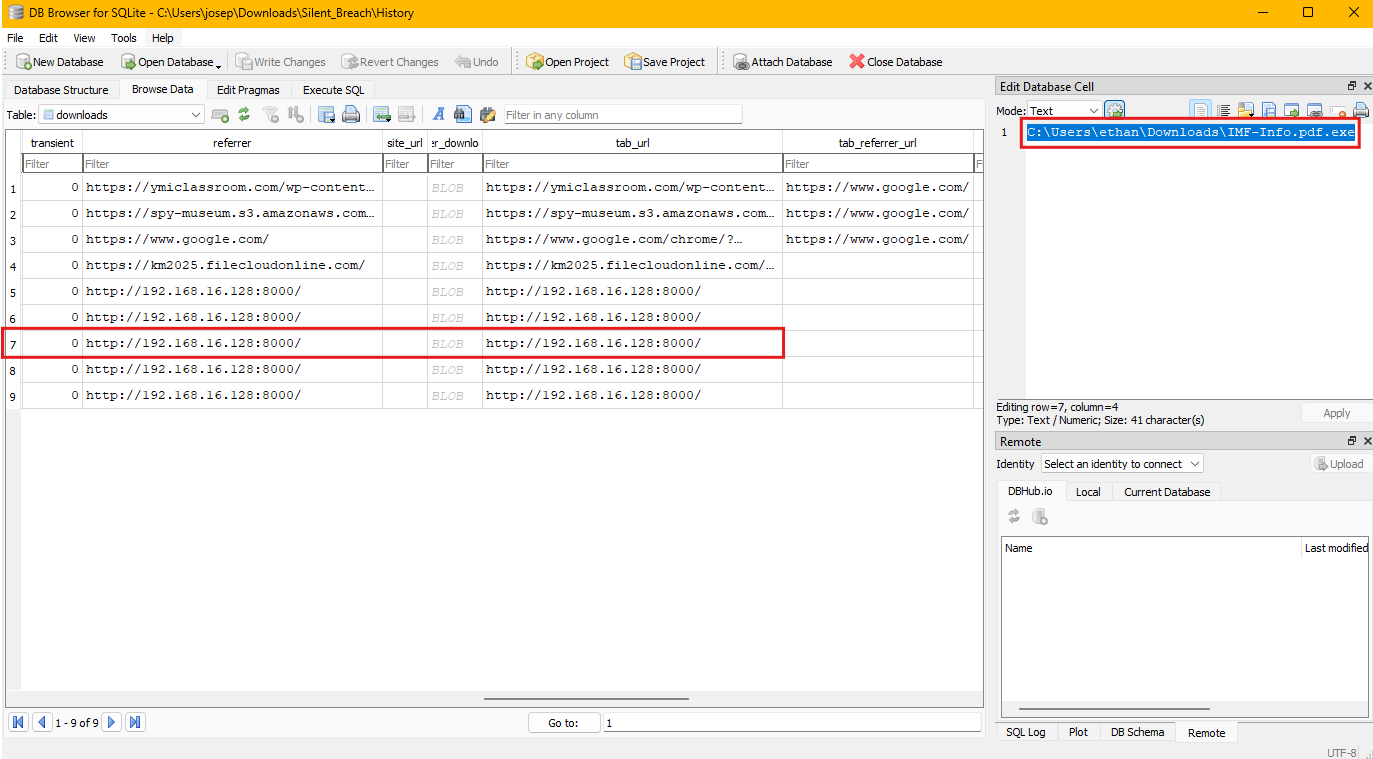
The analysis reveals multiple download entries in the database, but we can identify the specific entry that corresponds to our malicious file by correlating the timestamp and file path information. The downloads table shows that the suspicious executable was downloaded from the URL: http://192.168.16.128:8000/IMF-Info.pdf.exe
Question 3
Question 3: What application did the user use to download this file?
Based on our analysis in the previous question, the victim used the Microsoft Edge browser to download the malicious file. I made sure to check Google Chrome before checking Microsoft Edge.
Question 4
Question 4: By examining Windows Mail artifacts, we found an email address mentioning three IP addresses of servers that are at risk or compromised. What are the IP addresses?
Understanding user activities and communications can provide crucial insights into how attackers may have coordinated their operations or communicated about compromised infrastructure. Before diving into email artifact analysis, we should first establish a timeline of user activities to better understand the context of the security incident. The UserAssist registry key serves as an excellent starting point for understanding program execution activities on Windows systems. UserAssist is a Windows registry key that tracks program execution statistics, including the number of times applications have been run and when they were last executed. The UserAssist key is located within each user’s NTUSER.dat registry hive and it provides valuable evidence of what applications and files users have accessed during specific timeframes.
Next, I will use FTK Imager’s Image Mounting tool to view the NTUSER.dat file.

To analyze the NTUSER.dat registry hive effectively, we can utilize RegRipper. RegRipper contains numerous plugins that can parse different registry keys and present the information in a human-readable format, making it invaluable for us to quickly extract meaningful data from complex registry structures. When we run RegRipper against the NTUSER.dat hive with the UserAssist plugin, we can see a chronological list of executed programs, including when Windows Mail was accessed, which helps us establish the timeframe when email communications occurred.
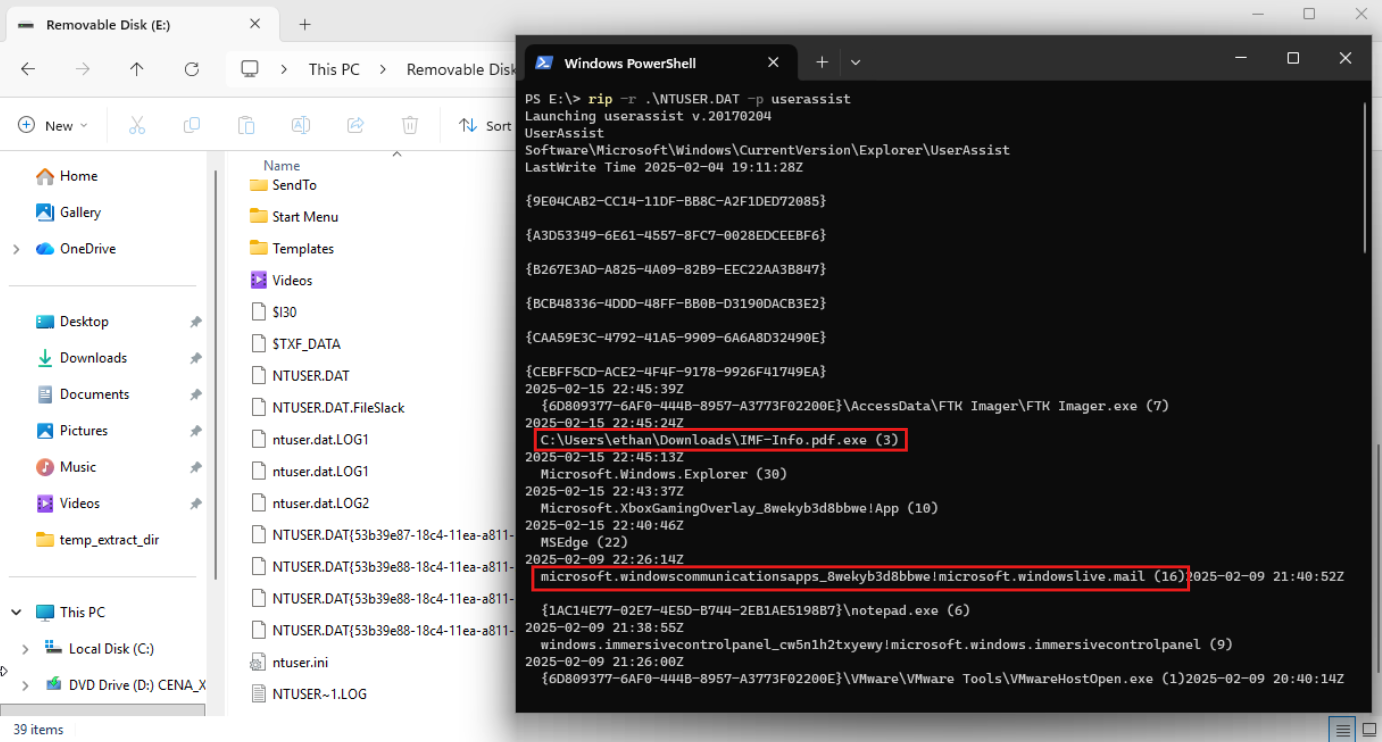
The analysis reveals that Windows Mail was indeed used during the incident timeframe, which confirms that email communications may contain relevant evidence about the security breach. Windows Mail stores it’s email data in various formats and locations, with one of the most important being the HxStore.hxd file, which contains the actual email message content. This file uses a proprietary storage format, but we can extract meaningful information using string extraction techniques.
File Path: C:\Users\ethan\AppData\Local\Packages\microsoft.windowscommunicationsapps_8wekyb3d8bbwe\LocalState\HxStore.hxd
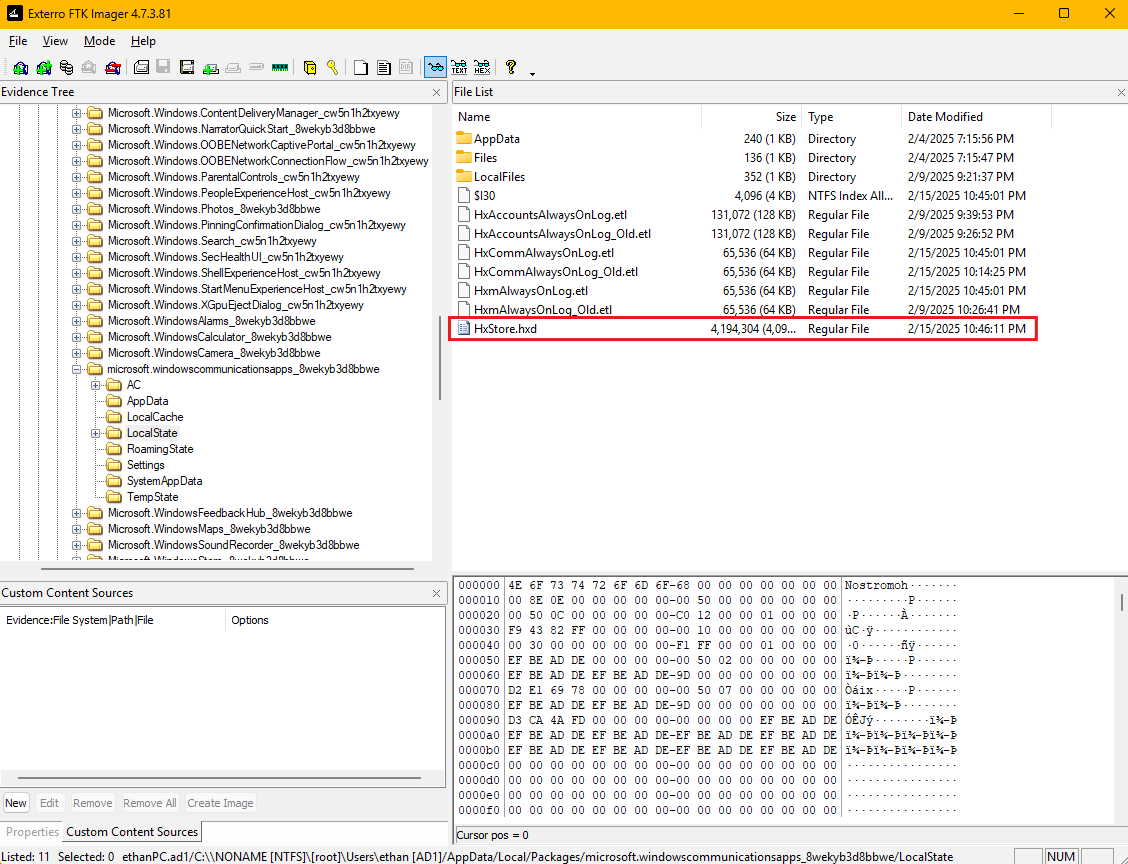
The HxStore.hxd file essentially serves as a database that contains email messages, attachments, and metadata, all stored in a binary format that requires specialized tools or techniques to access.
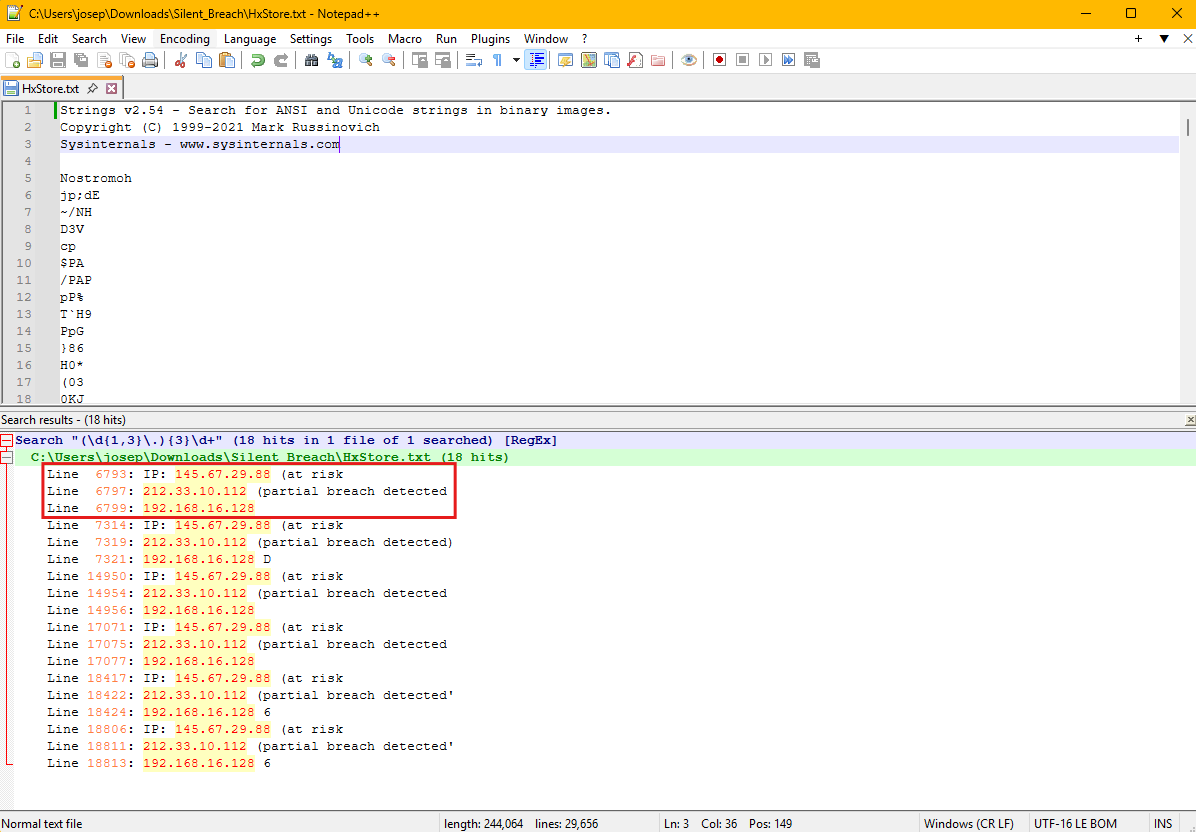
To recover email content from the HxStore.hxd file, we first export it from the forensic image using FTK Imager. Once we have the file extracted to our analysis workstation, we can use the strings command-line utility to extract human-readable text from the binary file. The strings utility is a fundamental forensic tool that searches through binary files to identify sequences of printable characters, effectively allowing us to extract text content from files that may not be directly readable. After running strings on the HxStore.hxd file, we obtain a large amount of text output that includes email headers, message content, and various metadata. To efficiently identify IP addresses within this output, we can use regular expression pattern matching to search for strings that match the standard IPv4 address format. Regular expressions provide a powerful way to search for specific patterns within large datasets, and the pattern for IPv4 addresses follows a predictable format of four octets separated by periods. When we apply an IP address regex pattern to the strings output, we can identify all IP addresses mentioned within the email communications, which reveals three specific IP addresses that are referenced in the context of servers being at risk or compromised.
I first used strings64.exe from the SysInterals Suite on Windows in order to extract the strings from the HxStore.hxd file. I sent the output to a file called HxStore.txt so it would be easier to view the strings.
Question 5
Question 5: By examining the malicious executable, we found that it uses an obfuscated PowerShell script to decrypt specific files. What predefined password does the script use for encryption?
To understand the full scope of the malicious executable’s capabilities, we need to conduct a deeper analysis of its internal structure and embedded components. Many modern malware samples employ multiple layers of obfuscation and contain embedded scripts or payloads that are only revealed through careful examination. The malicious executable we identified earlier contains embedded PowerShell code that performs various malicious activities, including file encryption operations that may be part of a ransomware attack or data exfiltration scheme. Static analysis techniques, such as string extraction, can reveal valuable information about the malware’s functionality without executing the potentially dangerous code.
Using FTK Imager, we extract the malicious executable file from the forensic image to our isolated analysis environment. Once we have the file exported, we can apply strings to extract human-readable text from the binary executable. When malware authors embed PowerShell scripts within their executables, these scripts often remain as readable text strings within the binary, making them accessible through string extraction techniques. After running strings on the malicious executable, we obtain a substantial amount of output that includes various text strings, function names, library references, and potentially embedded script content. To focus our analysis on PowerShell-related functionality, we can search through this output for keywords related to PowerShell execution, such as “powershell”, “ps1”, or specific PowerShell cmdlets and syntax patterns. This targeted search reveals the presence of obfuscated PowerShell code embedded within the executable.
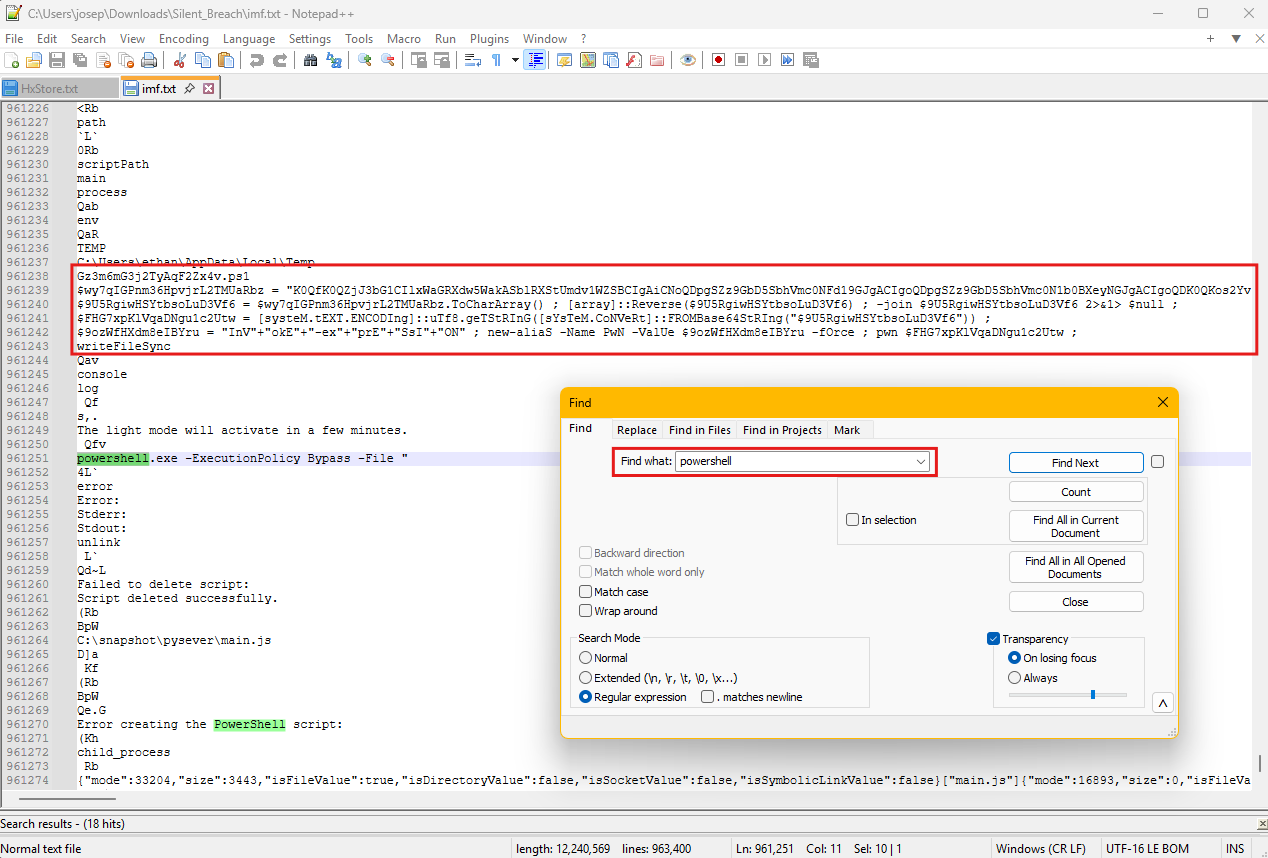
The embedded PowerShell script exhibits multiple layers of obfuscation, including base64 encoding, string concatenation, variable substitution, and other techniques commonly used by attackers to hide malicious functionality. Obfuscation serves multiple purposes in malware development, including evading signature-based detection systems, making reverse engineering more time-consuming, and hiding the true intent of the malicious code from both automated analysis tools and human analysts. However, despite these obfuscation techniques, we can extract the script content and work to deobfuscate it to reveal its underlying functionality.
To properly analyze the obfuscated PowerShell script, we extract it to a separate file and modify it. This involves adding console output statements and modifying the script’s execution flow to reveal intermediate values and decrypted content. When we implement these modifications and run the script in a controlled environment, we can observe how the obfuscation layers are removed and what the script’s true functionality entails. The analysis reveals that the script contains file encryption capabilities and uses the predefined password Imf!nfo#2025Sec$ for its cryptographic operations.
I made a new mal_script.ps1 file and added the obfuscated parts to it. I used the Word Wrap view option in VSCode to make the file easier to see in the code editor.

Question 6
Question 6: After identifying how the script works, decrypt the files and submit the secret string.
Having successfully analyzed the malicious PowerShell script and identified its encryption methodology, we can now proceed to reverse the encryption process and recover the original files that were compromised during the attack. The script we examined utilizes Advanced Encryption Standard (AES) encryption, which is a symmetric encryption algorithm, meaning the same cryptographic key that was used to encrypt the data can also be used to decrypt it back to its original form. This characteristic of symmetric encryption provides us with the opportunity to recover the encrypted files if we have access to the correct decryption key, which we have already identified from our previous analysis of the malicious script.
The first step in our file recovery process involves extracting the encrypted files from the forensic image using FTK Imager. When we examine the file system structure, we can identify the encrypted files based on their file extensions, timestamps, and the context provided by our previous analysis.
Once we have successfully extracted the encrypted files to our analysis environment, we need to modify the PowerShell script to perform decryption operations instead of encryption. This modification involves reversing the cryptographic operations performed by the original malicious script while maintaining the same key material and algorithm parameters that were used during the initial encryption process.
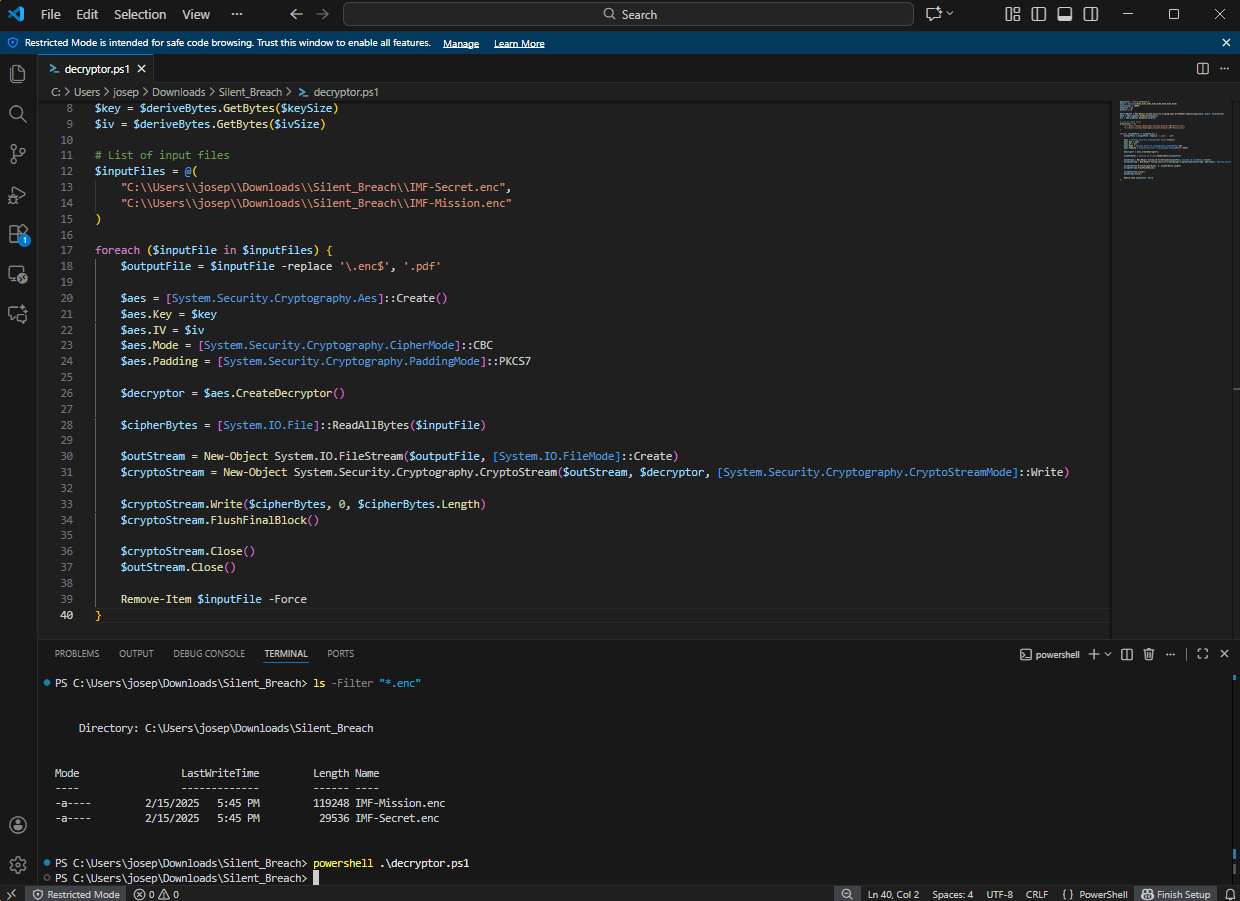
We configure the script to process the encrypted files we extracted from the forensic image, applying the AES decryption algorithm with the hardcoded password we identified earlier. The script processes each encrypted file individually, reading the encrypted content, applying the decryption transformation, and writing the recovered plaintext data to new output files with their original file extensions restored.
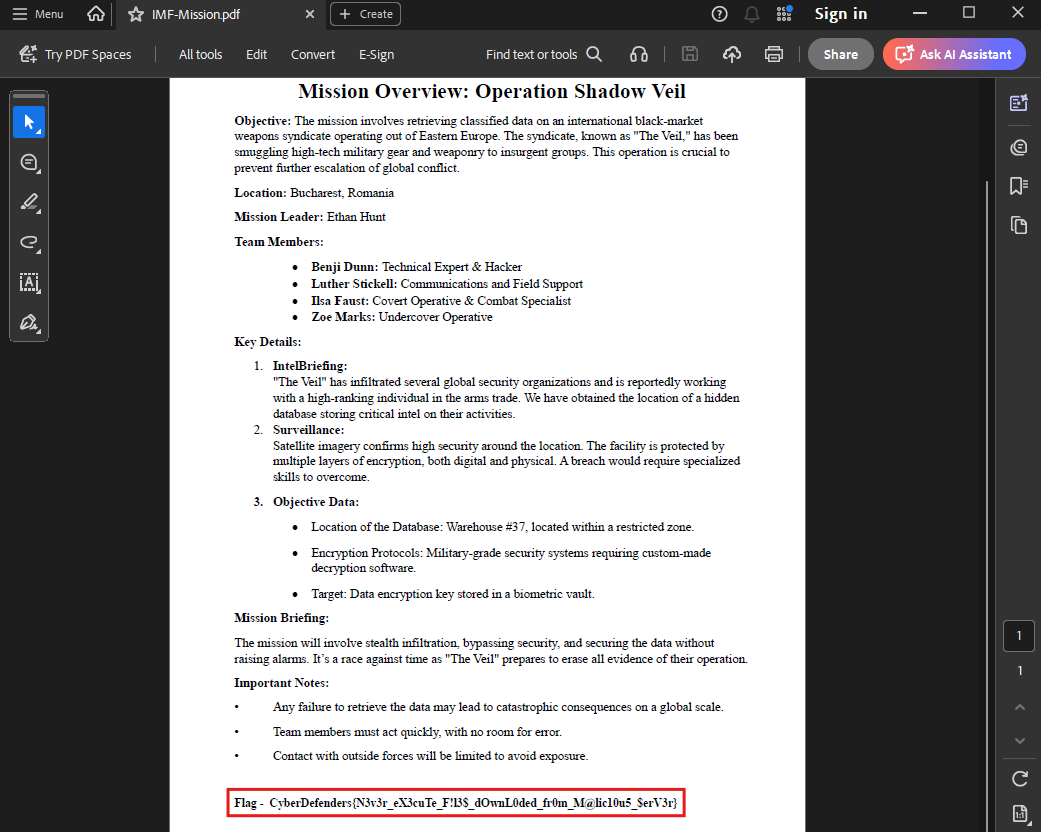
When we execute the modified decryption script against the encrypted files, the process successfully recovers the original file content, allowing us to access the data that was encrypted during the attack.
Conclusion
This lab taught me how to use FTK Imager to extract malicious downloads and find their origin, where to look for various IOCs on Windows systems, and how to do basic deobfuscation on a malware sample. I loved this lab and I continue to do more of them.